Blocking Unwanted (Landline) Telephone Calls
This post details how to achieve the blocking of landline telephone calls using a Linux operating system with only a sound input, a serial port and a simple electronic circuit.
The reasons for this are that I had a Linux media server next to the phone line, but no modem capable of caller ID on Linux, or a circuit capable of caller ID that could easily push the result to a computer.
I wanted to be able to block nuisance calls from telemarketers, most of which only showed up as “International” on the phone. Such a caller ID means “this call is from abroad but the identifying information got lost somewhere en route”.
If you’re considering blocking “International”, bear in mind that many VoIP to landline services also show up as such, but this design is capable of blocking any selection of numbers, or even on time of day if you want to adapt the scripting.
I should probably point out at this stage that I built this using things available to me at the time and it sure isn’t the best method or circuitry. I’m also definitely not suggesting one should connect unauthorised electronics to their phone line.
To get it working, several steps are needed:
- Listen to the phone line without causing the line to pick up
- Decode the caller ID pulse before the phone rings
- Check the ID against a list of numbers
- Answer and hang up to cut off the caller, also before the phone rings
Listening to the Phone Line
There are several circuits designed for listening to the phone line, I think mine is a bit of a mix based on what I had laying around. I have no idea what its REN rating is, the phones still ring so I imagine it’s fine. It’s currently wrapped in insulation tape but I think it looks something like this:
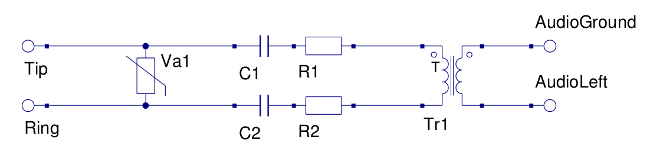
Tr1 is an 1:1 isolation transformer, I found mine on an old modem.
Va1 is a varistor, also from a modem, so probably the right rating.
Capacitors are 170V, 0.1uF
Resistors are too taped up to tell, starts with brown.
The audio output is for plugging into the computer’s audio input, or headphones while you’re trying to set it up and just want to listen.
Hanging Up on Unwanted Calls
There’s also a circuit designed to load the line (pick it up) when triggered, this one is controlled by one pin of the serial port on the computer (either DTR or RTS, I don’t recall which I used). It uses a relay from an old modem in order to place a resistor on the phone line without any electrical interference.

[ Looking at this now I’ve posted it I have a feeling that should be npn, and possibly flipped, so keep that in mind if you’re using this to build one rather than just reading out of interest ]
I don’t believe circuits are supposed to be driven by the serial port, hence the transistor switching. You’ll need some high wattage resistors to protect the diode and transistor if they’re not designed for 11 or so volts.
You’ll need an either an NPN or a PNP transistor, depending how you wire it up. When it triggers it connects the battery to the switch, which closes and drops the resistor across the line.
I’m not entirely convinced with the grounding around the transistor, but it hasn’t caught fire despite running constantly for several months.
Whatever serial port pin I used can be controlled by script, toggling between something like -11V and +11V. This is my /opt/pulse.sh [root]:
#!/bin/bash
stty 9600 -hup < /dev/ttyS0
sleep 2
stty 9600 hup < /dev/ttyS0
If there isn’t a serial port I’m sure there are other pins/ports that can be enabled/disabled.
Placing the resistor on the line causes the call to be answered, removing it is the equivalent of hanging up. The line may not clear instantly – as this was the receiving line we are given a grace period of about a minute after hanging up in case we just wanted to move to a telephone in a different room (possibly).
Decoding the Caller ID Signal
At this point, there is the ability to hang up the line by script, and the ability to listen to the line without interrupting it. Before the computer can decide when to run /opt/pulse.sh, it needs to decode the audio input to caller ID information.
Luckily there is already a program capable of decoding the signals called Multimon – the source for which can be found at http://www.baycom.org/~tom/ham/linux/multimon.html
I made a few modifications so that it had a few more line breaks, and flushed the buffer more frequently. As my phone line decodes satisfactorily using the CLIPFSK decoder, I only made changes in clip.c, you may need to change a different decoder though.
Hopefully this diff of the two files will give you the idea, basically I’ve added several line breaks in the output and forced the buffer to flush immediately after.
--- origclip.c	2012-02-06 15:52:50.000000000 +0000
+++ modclip.c	2013-01-08 00:05:10.136180849 +0000
@@ -21,6 +21,7 @@
 /* ---------------------------------------------------------------------- */

 #include "multimon.h"
+#include
 #include

 /* ---------------------------------------------------------------------- */
@@ -101,7 +102,8 @@

 		default:
 	                verbprintf(0, "%s: UNKNOWN Message type (0x%02x) len=%d ", s->dem_par->name, i, len+1);
-//			verbprintf(0, "\n");
+			verbprintf(0, "\n");
+			fflush(stdout);
 			return;
 	}

@@ -338,7 +340,8 @@
 							verbprintf(0, " Remote User Provided information");
 							break;
 						default:
-							verbprintf(0, " unknown (0x%02x)", i);
+							verbprintf(0, " unknown (0x%02x)\n", i);
+							fflush(stdout);
 							break;
 					}
 				}
@@ -370,14 +373,16 @@
 						verbprintf(0, " Service active");
 						break;
 					default:
-						verbprintf(0, " (0x%02x unknown)", i);
+						verbprintf(0, " (0x%02x unknown)\n", i);
+						fflush(stdout);
 						break;
 				}
                         	break;

 	                default:
                			msg_len--;
-        	                verbprintf(0, " unknown (0x%x)%c",i);
+        	                verbprintf(0, " unknown (0x%x)%c\n",i);
+				fflush(stdout);
                 	        break;
 		}
 	}
@@ -386,6 +391,7 @@
                 return;
         }
 	verbprintf(0, "\n");
+	fflush(stdout);
 }

 /* ---------------------------------------------------------------------- */
Once built, the binaries should probably be copied to /opt/multimon/ [root].
Since I’m running multimon as root so that it can access the /dev/dsp audio device, it is important that the multimon binaries are write protected from regular users. As an alternative I imagine the permissions on the device can be altered so it works for a non-root user.
You can optionally create a link to multimon somewhere useful [root]:
ln -s /opt/multimon/multimon /usr/bin/multimon
Number Matching
Now there is a program capable of handing out the caller ID, there needs to be something capable of matching them to numbers to block. This is /home/zorilla/callerid/monitor.pl:
#!/usr/bin/perl
$logfile="blocklog.txt";
while() {
chomp $_;
if(
   ($_ =~ m/International/i) // anything international
|| ($_ =~ m/08434106656/i)   // ppi claims
|| ($_ =~ m/020301611/i)     // background noise
) {
	print "HANGING UP\n";
	system("sudo /opt/pulse.sh");
	open(ILG, ">>$logfile");
	print ILG "$_\n";
	close(ILG);
}
}
It reads lines from stdin and if part of the line matches in the if statement it pulses the line and logs the calling input.
Here’s an example that trips it:
CLIPFSK: CS CT=. (0x01 indicator unknown) DATE=12191115 RACLI=O Unavailable CNT=INTERNATIONAL
You’ll need to give your user sudo permission to use /opt/pulse.sh
add something like this to /etc/sudoers [root]:
zorilla ALL= NOPASSWD: /opt/pulse.sh
In order to both see the output of multimon and pass it to the stdin of the monitoring script we need to use “tee” and a “named pipe”.
A named pipe can be created with
mkfifo /home/zorilla/callerid/clidpipe
and destroyed (when desired) with
rm /home/zorilla/callerid/clidpipe
If you create it as a regular user you’ll have write access, which is what you want.
Making It Run
Once that’s done you’ll need the script that uses it, /home/zorilla/callerid/start.sh:
#!/bin/bash
cd /home/zorilla/callerid/
sudo multimon -a CLIPFSK | tee clidpipe &
./monitor.pl < clidpipe
You’ll need to give your user sudo permission to use multimon
add something like this to /etc/sudoers [root]:
zorilla ALL= NOPASSWD: multimon
Starting on Boot
I’m not sure that rc.local is the current “correct” way of running scripts at startup in Fedora, but that’s what I’m using. You’ll need to add a line something like this to /etc/rc.d/rc.local [root]:
su - zorilla -c "/usr/bin/screen -dmS clid /home/zorilla/callerid/start.sh"
That basically means: switch to user zorilla, start a detached screen session named ‘clid’ and run the start.sh script in it.
Reconnecting to the Output
Then when connected to the computer you can run:
screen -r clid
and be reconnected to the output of the scripts.
Remember to use Ctrl+A, D in order to detach the screen session or you’ll end up terminating it.
The use of screen, tee, and the named pipe is unnecessary, but means you can peer into the workings if you need to.